

How To Make Your Photo Look Like A Painting In Photoshop
People just love taking their favorite photos and making them await like traditional water colour paintings. The simply caveat is the default watercolor filter in Photoshop looks like a filter was slapped on a photo. I have looked at a number of real watercolor paintings and experimented quite a lot. After some fourth dimension in the "lab" I have emerged with a potion! I accept devised a nice like shooting fish in a barrel fashion to get a h2o color issue that is sure to impress. Now I'grand going to share this with you. Watch the video then read the steps and bookmark them as a reference to come back to whoever you need that magical watercolor event. Spoiler alarm, this is fun and addictive!
Making a water color painting out of a photo in Photoshop
(Click to subscribe to our youtube channel for more tutorials). 
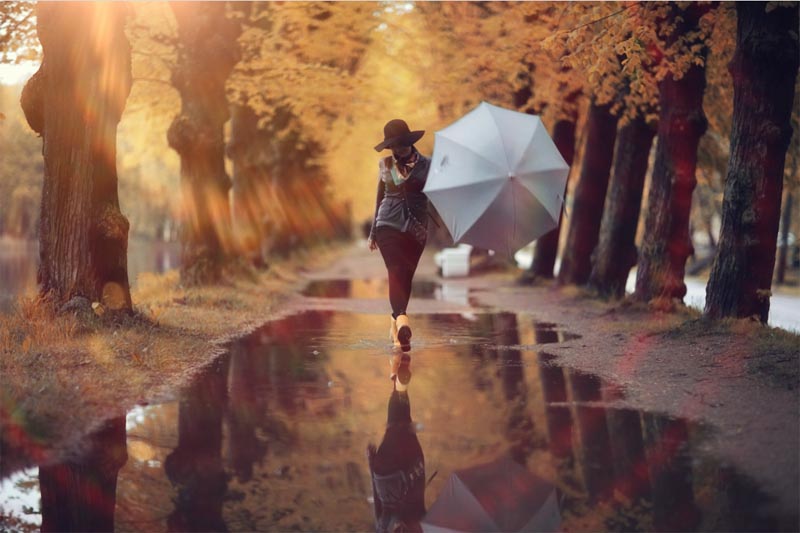
Let's first with this photo that I got from Adobe stock.
You can find information technology here motion picture of woman with umbrella | How to use photos from Adobe stock in Photoshop
► Go an Adobe Stock Contributor:
► 10 free images from Adobe Stock
Step 1
Indistinguishable the Groundwork layer (Ctrl/Cmd+J)

Step 2: Applying the basic watercolor filter
Let's apply the basic effect. Filter>FilterGallery

Cull the acme category, Artistic.
Click on Watercolor
- Brush Particular = 3
- Shadow Intensity = 0
- Texture =1
Click OK

You now have the basic water color effect (as seen in preview to a higher place). There is so much more we can do to add to realism from the basic filter and this is what will set your piece of work apart from the rest, let's go!
Step 3: Calculation an outline
Indistinguishable the background again and drag it to the meridian of the layers stack. Proper name it OL (outline).

Cull Filter>Stylize>Discover Edges (an oldie, but a goodie).
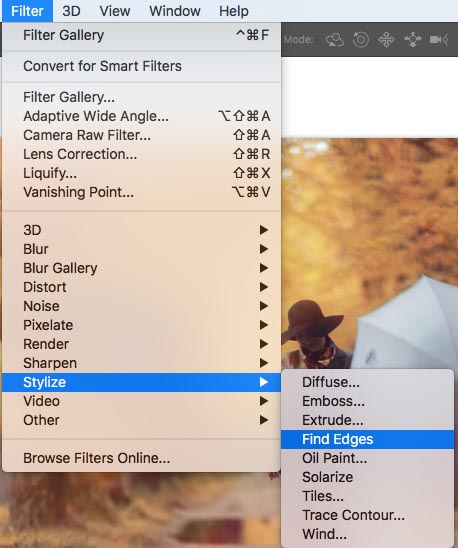
You will now see a colored outline.

Stride iv.
Lets brand information technology black and white. Printing Cmd/Ctrl+Shift+U (desaturate)

Step v
Let's use layer blending modes to hide all the white and but show the black, In the layer'southward panel, change the style from Normal to Multiply. (See more about Layer Blending Modes here)

and here is the consequence.

Let'south hide the outline for now, click the heart to the left of the layer to hide that layer.

Step half-dozen: calculation a watery color effect
This step is going to add to the overall painterly outcome. Create a new layer by clicking on the new Layer icon at the bottom of the layers panel.
Move the layer between the background copy and OL layers as shown.

Choose the eyedropper tool
Click on the dainty brilliant yellow color from the prototype. This volition set the foreground color
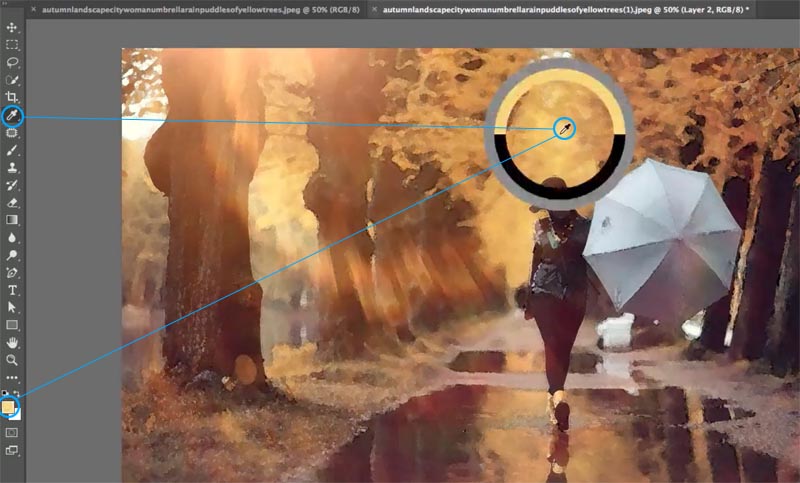
Nosotros at present want to gear up the background to another color in the photo that will complement the yellow. Lets choose the Orange brown, simply await!
We want to set the groundwork colour, and then concur downward the alt/option key when you click and the background color volition be set.

Choose Filter>Return>Clouds

Let'due south blend the new colors in.
Change the Layer blending mode to Soft Lite

Encounter the squeamish effect we are starting to get?

Sometimes you lot tin still see the blueprint of the clouds, so let'due south soften that effect. Choose Filter>Blur>Gaussian Blur. I set information technology to virtually 8.

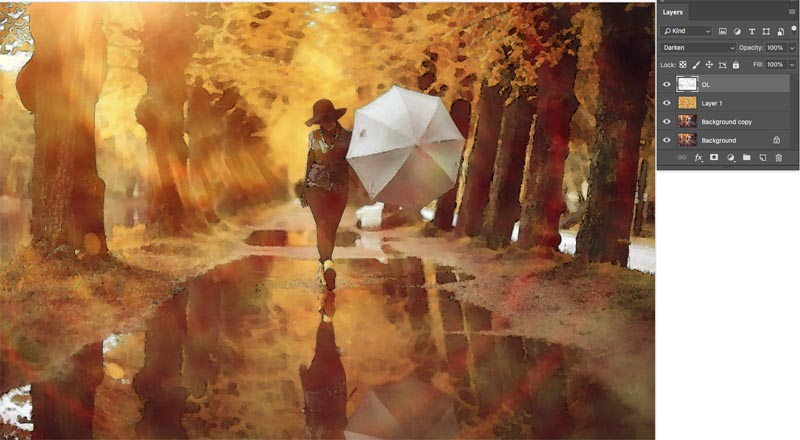
Step 7.
Turn the Outline layer back on (OL). If it seems too nighttime, change the blending mode to Darken like I have done here (optional).
Step 8. Making the h2o color wait dabbed on with a brush
This is the very best function of the tutorial and something else you lot won't find anywhere else (Don't you just love the original tutorials hither at PhotoshopCAFE)? We are going to brand information technology look like this was all painted carefully with brushes and sponges.
Unlock that background layer past clicking on the padlock. (Turns it into a regular layer).

Create a new layer at the bottom of the stack. (Choose the bottom layer and hold down Cmd/Ctrl while clicking the new layer icon, This creates a layer underneath the existing layer)

Fill it with white, or a faint color. This volition exist the new canvas color. (y'all will run into presently).

Step 9: Creating a brush
Let'southward create a new certificate. Set information technology to1920X1080 with a white background.
File> New
Use the legacy dialog box

Or the newer one, doesn't affair.

Click ok to create the new document.
Press the D key to reset the color swatches.
![]()
Cull Filter>Render>Clouds

Let's brand the shape of our brush.
Cull the elliptical Marquee tool.

Depict an oval. Tip: start in the centre and hold down the Alt/Option primal as you drag to describe from center.

Permit'southward soften the edge of the selection
Choose Select>Modify Selection>Feather
Gear up it to a overnice large number like 100

At present it's fourth dimension to go far into a brush!
Cull Edit>Define Brush Preset
Proper name it Watercolor soft, or whatever you like actually.

When you fill the folio with white and tap one time with black, this is what the brush should expect similar.
You can now close this new certificate, weldon't need it whatsoever more than, we have our brush.

Step 10: Using the brush to get amazing results!
Alright, dorsum to our water color image (Give thanks goodness nosotros but accept to create this brush once, and we will e'er take it for the future).
Select all the layers except for the groundwork: Click on the top layer, hold shift and click on the Layer 0, all the layers between are now selected equally shown.

Let'southward put all the layers into a Layer grouping. Press the G cardinal and y'all will run across they are all nicely tucked away in a folder.

We desire to add a Layer Mask, but a mask that will hide all the layers. Hold down Alt/Option as yous click the new layer mask icon and you will see a black mask has been created. This hides everything. Larn about Layer masks here.

Cull the B key to select the brush tool. Our deject brush should still be selected. (If non, cull it from the Brushes console).
At the summit, drop the opacity to 30%. Nosotros want to gradually paint and build up the issue.
![]()
Cull white every bit the foreground color
![]()
Dab once on the canvas with the brush (layer mask selected). You can meet that that it looks like we lightly painted on the page with real brushes and sponges.

Keep dabbing the event, keep it lighter around the edges. You can use [ and ] to brand the brush larger or smaller.

And here is the result. Pretty neat huh? Don't forget to watch the video at the pinnacle for a walkthrough and a few actress tips.

Hither is another example from a different photograph.

I'd really love to encounter what you lot do with this effect. Please tag me @photoshopCAFE when you postal service on instagram, Facebook or Twitter.
If you like this tutorial, delight tell all your friends about PhotoshopCAFE and share this tut on social media!
Thanks for watching, and until adjacent Tuesday!
Adept to come across yous hither at the Cafe
Check out all out other free tutorials | Join our mailing list for free tuts and goodies
Colin
Source: https://photoshopcafe.com/turn-photo-watercolor-painting-photoshop/
Posted by: joynerjokened.blogspot.com
0 Response to "How To Make Your Photo Look Like A Painting In Photoshop"
Post a Comment